

close
Choose Your Site
Global
Social Media
Views: 0 Author: Site Editor Publish Time: 2026-08-12 Origin: Site


Executing a complex meal requires simultaneous temperature extremes. You must rapidly boil pasta water or sear heavy cuts of meat while delicately holding a butter-based sauce at a bare simmer without breaking it. Standard cooktops often force a difficult compromise on the line. They offer burners lacking the necessary British Thermal Units (BTUs) for a true, crust-forming sear, or they fail to dial down low enough to prevent scorching delicate ingredients in small saucepans. Upgrading to a purpose-built Three Burner Gas Hob resolves this tension entirely. By utilizing a dedicated layout, these appliances provide specialized burners engineered for specific thermal tasks. This eliminates the need for manual workarounds, prevents ruined pans, and ensures consistent culinary results during heavy service.
Dedicated Thermal Zones: A three burner configuration typically features a high-output wok/rapid burner, a versatile semi-rapid burner, and a dedicated auxiliary burner, ensuring no compromise between searing power and simmering precision.
Workflow Efficiency: The layout allows cooks to seamlessly transition cookware from a rolling boil on the rapid burner to a sustained, constant temperature on the auxiliary burner without heat fluctuation.
Valve and Cap Engineering: True simmering relies on dual-valve controls and specialized burner caps rather than manual "hacks," allowing for stable, low-BTU output without flame extinction.
Optimized Spatial Efficiency: For a family kitchen gas hob, the three-burner layout maximizes pan clearance, allowing large skillets and small saucepans to operate simultaneously without crowding.
Implementation Requirements: Selecting the right unit requires evaluating the total BTU spread, gas pressure compatibility (Natural Gas vs. LPG), and the presence of safety mechanisms like flame failure devices (FFD).
Buyers often assume all gas burners function identically. This misconception leads to extreme frustration in the kitchen. Attempting to cook delicate dishes on high-output valves usually results in burnt food and ruined cookware. A true multi zone gas cooktop solves this by varying injector sizes, valve bypass channels, and primary aeration across the unit. You must understand these distinct mechanical roles to balance heat effectively across different cooking vessels.
The rapid or wok burner handles maximum heat output. These burners typically deliver between 10,000 and 18,000 BTUs. Manufacturers engineer them specifically for rapid boiling, deep frying, and wok cooking. The large diameter spreads intense flames across wide cookware bases. The venturi tubes beneath these burners are wider, allowing a massive volume of primary air to mix with the gas before combustion. This creates a sharp, blue, high-velocity flame that transfers thermal energy rapidly into cast iron or carbon steel.
The semi-rapid burner acts as the mid-range workhorse. It usually outputs between 5,000 and 10,000 BTUs. You use this zone for standard sautéing, frying eggs, and general daily cooking tasks. It provides moderate, manageable heat. The flame spread is narrower, making it ideal for 8-inch to 10-inch skillets. This burner prevents the flames from licking up the sides of medium-sized pans, which wastes gas and overheats the pan handles.
The auxiliary burner serves as the precision low-heat zone. It typically generates under 5,000 BTUs. Engineers calibrate this small burner specifically for melting butter, holding sauces, and gentle simmering. The restricted gas flow prevents accidental boiling. The physical brass or aluminum cap is much smaller, concentrating a tiny ring of fire directly into the center of small saucepans. This localized heat prevents the perimeter of delicate sauces from scorching.
You must read manufacturer specifications carefully. Ensure the cooktop offers a wide enough thermal range for your cooking style. A high-quality hob demonstrates a stark contrast between its maximum and minimum output ratings. If the auxiliary burner output is too close to the semi-rapid burner, simmering becomes impossible. Look for a distinct drop in BTUs across the three zones. The gas manifold must distribute pressure evenly so that running the rapid burner on high does not starve the auxiliary burner of fuel.
Burner Output Specifications and Culinary Applications
Burner Category | Typical Output Range (BTU) | Primary Culinary Use | Recommended Cookware Size |
|---|---|---|---|
Rapid / Wok | 10,000 - 18,000+ | Searing, Boiling, Stir-frying | 10 to 14 inches |
Semi-Rapid | 5,000 - 10,000 | Sautéing, Pan-frying | 8 to 10 inches |
Auxiliary | 1,000 - 5,000 | Simmering, Melting, Holding | 4 to 8 inches |
Transitioning a pot from a rolling boil to a delicate simmer remains a common culinary challenge. Dropping the temperature too quickly can stop the cooking process entirely. Leaving it on a hot burner causes overcooking and liquid evaporation. A three burner gas hob streamlines this workflow perfectly by providing dedicated zones for each phase of the recipe.
You should move the vessel directly from the rapid burner to the pre-set auxiliary burner. This physical transfer ensures the liquid temperature remains constant. The auxiliary burner sustains the heat without dropping it too low. This technique prevents the simmer from stopping entirely during the transition phase. The thermal mass of the liquid carries enough heat to bridge the gap during the physical move. Once placed on the auxiliary burner, the low BTU output simply replaces the heat lost to the surrounding air, maintaining a perfect equilibrium.
The physical design of the smallest burner dictates its simmering capability. It features smaller gas injector orifices. For example, a Natural Gas auxiliary injector might measure just 0.70mm, restricting the fuel flow drastically compared to a 1.50mm rapid injector. It also utilizes restricted airflow channels. These physical constraints prevent the flame from extinguishing at very low settings. The compact burner cap concentrates the minimal heat directly into the center of small saucepans. This design prevents ambient room drafts from blowing out the tiny flame.
Advanced dual-valve systems offer superior control over the flame. These valves allow users to independently manage the inner and outer flame rings on the rapid burner. You can shut off the outer ring entirely. This drops the heat to a fractional output. It allows for extended, unattended simmering without scorching the pan edges. Inside the brass valve body, a secondary bypass channel routes a microscopic amount of gas to the inner ring, bypassing the main flow valve entirely. This mechanical separation guarantees a stable low flame.
Many users rely on unsafe manual workarounds to achieve a low flame. The "ignite hack" is a common example. Users turn the knob backward toward the ignite position to force a lower flame. This practice is highly dangerous. It bypasses the engineered valve stops. Relying on a dedicated low-BTU auxiliary burner is significantly safer. It provides consistent heat and drastically reduces the risk of accidental gas leaks. Forcing the valve into an unintended position can cause flame lift-off, where the fire detaches from the burner cap and extinguishes, filling the room with unburned gas.
Active temperature management offers a safer alternative when a burner runs slightly hot. You can utilize simple culinary techniques to control the heat. Stirring the pot with a wooden or stainless steel spoon dissipates excess thermal energy. This physical action helps prevent a gentle simmer from progressing back into a rapid boil. You can also use a cast iron heat diffuser plate. Placing this heavy metal disc between the burner and the pot absorbs the direct flame and radiates a gentle, even heat into the cookware.
Factory baseline calibration plays a major role in simmer performance. You can adjust the physical flame height on most gas valves. Follow these steps to tune your baseline simmer:
Ignite the auxiliary burner and turn the control knob to the lowest possible setting.
Pull the plastic or metal control knob straight up and off the valve stem.
Locate the small brass bypass screw. It sits either directly inside the hollow valve shaft or immediately next to it on the manifold body.
Insert a precision flathead screwdriver into the bypass screw.
Turn the screw clockwise to restrict gas flow and lower the flame, or counterclockwise to increase it.
Adjust until you achieve a stable, roughly quarter-inch flame that rests just above the burner cap without flickering.
Test the stability by quickly turning the valve stem from high to low. The flame must not blow out.
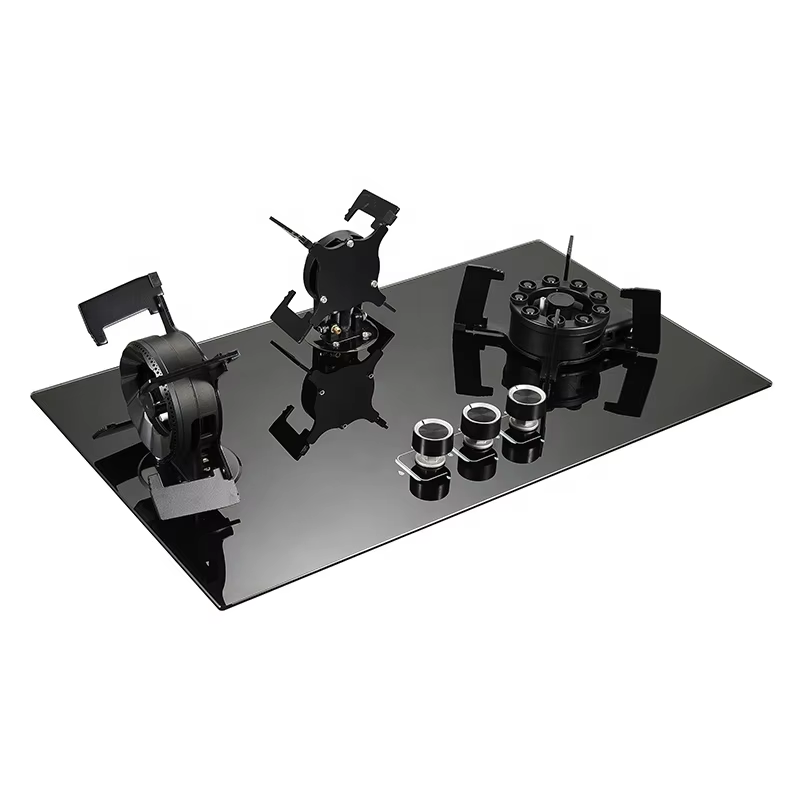
Achieving a restaurant-quality sear requires immense, immediate heat. The rapid burner must transfer thermal energy efficiently into the cookware. Structural integrity and material choices dictate how well the hob performs under extreme temperatures. A weak burner will struggle to recover its heat after you drop a cold steak into a hot pan.
High heat demands robust structural requirements. Premium rapid burners often utilize dual or triple brass burner rings. Brass withstands extreme temperatures better than aluminum. It resists warping and corrosion over time. These multiple rings distribute intense heat evenly across large-diameter cookware. This prevents cold spots when searing thick cuts of meat. The heavy brass construction also retains heat, stabilizing the flame pattern even when a heavy pot is dropped onto the grates.
Cast-iron pan supports are essential for high-heat cooking. They absorb and radiate heat efficiently. Continuous grates provide a flat, stable surface across the entire cooktop. They allow heavy pots to slide off the high-heat zone quickly. You can move a cast-iron skillet to a cooler zone without lifting it. The grate-to-flame distance also dictates performance. A properly engineered gap ensures the high BTUs transfer directly to the cookware bottom rather than escaping sideways. Rubber feet mounted beneath the cast iron grates prevent them from scratching the stainless steel or tempered glass surface during aggressive pan movements.
Choosing the right burner layout impacts daily kitchen operations. You must balance available countertop space with actual cooking capacity. A family kitchen gas hob requires thoughtful spatial planning to accommodate large meals without creating a frustrating, cramped workspace.
A three-burner layout offers a strategic middle ground. Traditional two-burner models are often too limiting for family meals. Standard four-burner models can feel incredibly cramped on a standard 60cm chassis. The three-burner design removes one cooking zone to expand the physical space between the remaining burners. This maximizes usable cooking area without requiring a massive countertop cutout. You gain the ability to center large pans directly over the heat source without them hanging off the edge of the appliance.
The geometric layout directly affects cooking ergonomics. Most three-burner hobs use a triangular or linear configuration. This intelligent spacing prevents long pan handles from overlapping. It easily accommodates oversized family cookware simultaneously. You can operate a 12-inch skillet on the rapid burner and a large 10-inch stockpot on the semi-rapid burner without them colliding. This physical separation also keeps the control knobs cooler, as the large pans do not radiate heat directly down onto the user interface.
You must acknowledge the inherent trade-offs of this design. A three-burner hob maximizes physical space for large pots. However, it sacrifices the sheer volume of simultaneous cooking zones. You cannot run four separate pans at once. It lacks the capacity found in 5-burner or 36-inch commercial-style ranges. You trade quantity of zones for quality of space. For most residential applications, having three fully usable zones is far superior to having four zones that cannot be used simultaneously due to pan crowding.
Installing a new gas appliance requires strict attention to technical details. You cannot simply drop a new unit into an old hole. Proper implementation ensures safety, efficiency, and legal compliance. Gas work demands precision and adherence to local building codes.
You must assess compatibility with your existing infrastructure. Determine whether your home uses Natural Gas (NG) or Liquid Propane (LPG). These gases operate at entirely different pressures. Natural Gas typically flows at 4 to 5 inches of water column pressure. LPG requires higher pressure, usually around 10 to 11 inches of water column, to flow correctly. You must use specific conversion kits when switching between gas types. Failing to change the injector nozzles drastically affects flame height. It ruins simmering capability and creates dangerous combustion issues, including heavy carbon monoxide output and soot buildup on your pans.
Gas Pressure and Orifice Sizing Guidelines
Gas Type | Standard Operating Pressure (Water Column) | Relative Orifice Size Requirement | Combustion Characteristics |
|---|---|---|---|
Natural Gas (NG) | 4" - 5" | Larger (e.g., 1.50mm for Rapid) | Lighter than air, dissipates upward |
Liquid Propane (LPG) | 10" - 11" | Smaller (e.g., 0.90mm for Rapid) | Heavier than air, pools at floor level |
Verify your physical countertop dimensions before purchasing. Measure the existing cutout width and depth precisely. Check the under-counter clearance requirements. Gas hobs need specific ventilation space below the chassis to draw in secondary air for combustion. Ensure the gas inlet pipe does not interfere with oven housings or cabinet drawers. Standardizing these measurements ensures seamless integration into your existing kitchen cabinetry. You must also account for the thickness of the countertop material, especially if mounting the hob flush into stone or quartz.
Modern gas installations demand strict safety mechanisms. Flame Failure Devices (FFD), also known as thermocouples, are absolutely mandatory. These small metal probes sit next to the burner cap. They detect the heat of the flame. When heated, the dissimilar metals inside the thermocouple generate a tiny electrical current, usually between 20 and 30 millivolts. This current powers a small electromagnet inside the gas valve, holding it open. If a low, quarter-inch simmer flame is blown out by a sudden draft, the thermocouple cools down instantly. The electrical current stops, the electromagnet releases, and a spring slams the gas valve shut. This prevents unburned gas from filling your kitchen.
A three-burner layout represents the optimal balance of high-performance searing and delicate simmering. It provides distinct thermal zones without crowding your cookware. This configuration excels provided the unit features a dedicated auxiliary burner and a wide BTU spread. It transforms daily meal preparation by eliminating cramped cooking surfaces.
Measure your existing countertop cutouts and under-cabinet clearance accurately before ordering.
Verify your local gas supply type to ensure you order the correct NG or LPG configuration.
Hire a certified gas safe engineer to evaluate your current gas pressure, pipe routing, and ventilation.
Adjust the bypass screws on the valves immediately after installation to set your baseline simmer.
A: Remove the control knob by pulling it straight up from the manifold. Locate the small brass bypass screw inside or beside the valve stem. Turn the burner to its lowest setting. Use a precision flathead screwdriver to turn the screw clockwise to decrease gas flow or counterclockwise to increase it. Stop when you achieve a stable, quarter-inch flame that does not flicker or extinguish when you quickly turn the knob from high to low.
A: Ignite the auxiliary burner and set it to low. Physically move the pot from the high-heat rapid burner directly to the pre-lit auxiliary burner. This immediate transfer maintains the liquid's thermal momentum. It prevents the temperature from dropping too fast, ensuring the simmer remains constant throughout the remaining cooking time without requiring constant valve adjustments.
A: Simmering on a rapid burner is highly difficult unless it features a dual-valve system. Standard rapid burners output too many BTUs even on their lowest setting, which will eventually bring small volumes of liquid back to a boil. You must use a heat diffuser plate or physically offset the pan from the center of the flame to prevent scorching.
A: The lowest flame setting is achieved on the auxiliary burner turned to its minimum position. The ideal simmer flame should be roughly one-quarter of an inch tall. It must sit just above the burner cap. The flame should be entirely blue, stable, and resistant to minor room drafts without blowing out or lifting off the burner ring.
A: Your stove keeps boiling because the burner's minimum BTU output is still too high for the volume of liquid in the pan. The valve bypass screw likely needs adjustment. Stirring the pot actively with a wooden or stainless steel spoon helps dissipate excess thermal energy into the air. This physical action brings down the temperature and prevents the simmer from progressing into a boil.
A: Yes, a 3-burner hob is generally better for large pans on a standard 60cm or 70cm chassis. By removing the fourth burner, manufacturers increase the physical distance between the remaining zones. This triangular or linear layout prevents large skillets and stockpots from colliding, offering superior ergonomics and handle clearance compared to a cramped 4-burner layout.


